Thứ Năm, 24 tháng 3, 2022

[Rancher] Updating a private CA

 I. References

  1. https://rancher.com/docs/rancher/v2.0-v2.4/en/installation/resources/update-ca-cert/
  2. https://mariadb.com/docs/security/encryption/in-transit/create-self-signed-certificates-keys-openssl/
  3. https://medium.com/@superseb/zero-to-rancher-2-x-single-install-using-created-self-signed-certificates-in-5-minutes-5f9fe11fceb0
  4. https://chowdera.com/2021/04/20210420154722157P.html
  5. https://www.suse.com/c/rancher_blog/manual-rotation-of-certificates-in-rancher-kubernetes-clusters/
  6. https://rancher.com/docs/rancher/v2.0-v2.4/en/cluster-admin/certificate-rotation/
  7. https://github.com/rancher/rancher/issues/32210
  8. https://tienbm90.medium.com/how-to-renew-rancher-certificates-when-expired-cf8f05942eac

II. Các bước thực hiện

Dấu hiệu nhận biến lỗi

https://127.0.0.1:6443/apis/management.cattle.io/v3/nodes?timeout=30s: x509: certificate has expired or is not yet valid

B1. Backup rancher

docker create --volumes-from priceless_pare --name rancher-data-20220324 registry.ott.vas.com:8443/rancher/rancher:v2.4.5

docker run  --volumes-from rancher-data-20220324 -v $PWD:/backup:z registry.ott.vas.com:8443/busybox tar pzcvf /backup/rancher-data-backup-2.4.5-20220324.tar.gz /var/lib/rancher


B2. Generate CA

https://medium.com/@superseb/zero-to-rancher-2-x-single-install-using-created-self-signed-certificates-in-5-minutes-5f9fe11fceb0

mkdir -p /home/recommen/env/rancher/certs

cd /home/recommen/env/rancher

docker run -v $PWD/ssl:/certs \

           -e CA_SUBJECT="Rancher tv360 viettel" \

           -e CA_EXPIRE="36500" \

           -e SSL_EXPIRE="36500" \

           -e SSL_SUBJECT="10.240.158.51:8443" \

           -e SSL_DNS="10.240.158.51:8443" \

           -e SILENT="true" \

           registry.ott.vas.com:8443/superseb/omgwtfssl:latest


B3. Tao lai rancher

docker run -d --restart=unless-stopped -p 8080:80 -p 8443:443 \

   --volumes-from rancher-data-20220324 \

   -v $PWD/ssl/cert.pem:/etc/rancher/ssl/cert.pem \

   -v $PWD/ssl/key.pem:/etc/rancher/ssl/key.pem \

   -v $PWD/ssl/ca.pem:/etc/rancher/ssl/cacerts.pem \

   --name rancher_server \

   registry.ott.vas.com:8443/rancher/rancher:v2.4.5


B4. Update cert tren agent

https://rancher.com/docs/rancher/v2.0-v2.4/en/installation/resources/update-ca-cert/

Method 2: Manually update checksum

$ curl -k -s -fL <RANCHER_SERVER>/v3/settings/cacerts | jq -r .value > cacert.tmp

$ sha256sum cacert.tmp | awk '{print $1}'

$ kubectl edit -n cattle-system ds/cattle-node-agent

$ kubectl edit -n cattle-system deployment/cattle-cluster-agent

Update checksum CATTLE_CA_CHECKSUM

Thứ Năm, 10 tháng 3, 2022

[Spring-boot] simple metrics with prometheus

 A. References

  1. https://www.callicoder.com/spring-boot-actuator/
  2. https://micrometer.io/docs
  3. https://prometheus.io/ 
  4. https://grafana.com/docs/grafana/latest/
B. Demo show chỉ số từ ứng dụng Spring-boot sang Prometheus và vẽ biểu đồ lên Grafana
I. Ứng dụng Spring boot exposing các chỉ số metrics từ ứng dụng

1. Khởi tạo ứng dụng
Tạo ứng dụng chọn các Dependencies:
- Spring boot Actuator
- Prometheus


Hoặc add thêm dependencies vào pom.xml

<dependency> <groupId>org.springframework.boot</groupId> <artifactId>spring-boot-starter-actuator</artifactId> </dependency> <dependency> <groupId>io.micrometer</groupId> <artifactId>micrometer-registry-prometheus</artifactId> <scope>runtime</scope> </dependency>


Hiển thị danh sách các actuator enpoint như dưới


2. Cấu hình chỉ cần hiển thị các enpoint phù hợp
Trong file app.properties thêm các cấu hình sau
# Use "*" to expose all endpoints, or a comma-separated list to expose selected ones
management.endpoints.web.exposure.include=health,info,prometheus
management.endpoints.web.exposure.exclude=
Cấu hình port chạy metrics:

management.server.port=8081

3. Một số loại actuator enpoint thông dụng
3.1 /health
  • Check trạng thái ứng dụng, có thể kết hợp một số loại chỉ số check khác như trạng thái kết nối đến Database, Redis, MongoDb, hoặc tùy chỉnh một chỉ số cần check.
Để hiển thị chi tiết hơn thông tin, thêm tham số sau vào file cấu hình app.properties
# HEALTH ENDPOINT
management.endpoint.health.show-details=always


  • Tùy chỉnh chỉ số health check.
Có thể tao các chỉ số health check riêng bằng cách implement từ interface HealthIndicator hoặc extend từ abstract class AbstractHealthIndicator
package com.example.actuatordemo.health;

import org.springframework.boot.actuate.health.AbstractHealthIndicator;
import org.springframework.boot.actuate.health.Health;
import org.springframework.stereotype.Component;

@Component
public class CustomHealthIndicator extends AbstractHealthIndicator {

    @Override
    protected void doHealthCheck(Health.Builder builder) throws Exception {
        // Use the builder to build the health status details that should be reported.
        // If you throw an exception, the status will be DOWN with the exception message.
        
        builder.up()
                .withDetail("app", "Alive and Kicking")
                .withDetail("error", "Nothing! I'm good.");
    }
}

Kết quả sau khi truy cập link http://localhost:8080/actuator/health
{
   "status":"UP",
   "details":{
      "custom":{
         "status":"UP",
         "details":{
            "app":"Alive and Kicking",
            "error":"Nothing! I'm good."
         }
      },
      "diskSpace":{
         "status":"UP",
         "details":{
            "total":250790436864,
            "free":97949245440,
            "threshold":10485760
         }
      }
   }
}
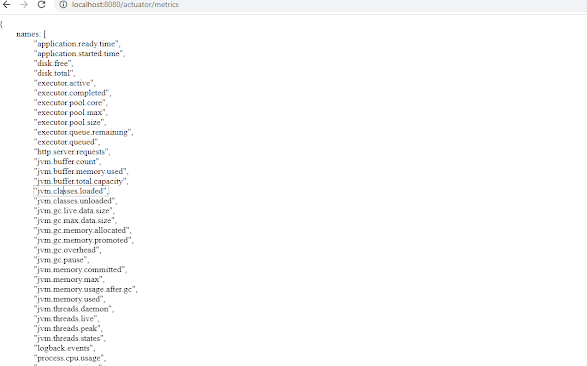
3.2 /Metrics
list tất cả các metrics mà có thể theo dõi


Để lấy chi tiết 1 metrics truy cập theo link http://localhost:8080/actuator/metrics/{metrics name}
VD: http://localhost:8080/actuator/metrics/system.cpu.count

3.3 /prometheus
Các chỉ số prometheus để bên prometheus có thể scrap dữ liệu, có thể tra cứu xem các tham số ứng dụng đẩy lên prometheus đã có ở đây chưa.


4. Bảo mật Actuator Endpoint với Spring Security
Actuator Enpoint là nhạy cảm cần được bảo mật để chặn các truy cập trái phép. Có thể sử dụng Spring Security để bảo mật nếu ứng dụng chưa có cơ chế bảo mật.
  • Add thêm dependency vào ứng dụng
<dependency>
   <groupId>org.springframework.boot</groupId>
   <artifactId>spring-boot-starter-security</artifactId>
</dependency>
  • Thêm class sau để override lại default spring security và định nghĩa các rule truy cập
package com.example.actuatordemo.config;

import org.springframework.boot.actuate.autoconfigure.security.servlet.EndpointRequest;
import org.springframework.boot.actuate.context.ShutdownEndpoint;
import org.springframework.boot.autoconfigure.security.servlet.PathRequest;
import org.springframework.context.annotation.Configuration;
import org.springframework.security.config.annotation.web.builders.HttpSecurity;
import org.springframework.security.config.annotation.web.configuration.WebSecurityConfigurerAdapter;

@Configuration
public class ActuatorSecurityConfig extends WebSecurityConfigurerAdapter {

    /*
        This spring security configuration does the following

        1. Restrict access to the Shutdown endpoint to the ACTUATOR_ADMIN role.
        2. Allow access to all other actuator endpoints.
        3. Allow access to static resources.
        4. Allow access to the home page (/).
        5. All other requests need to be authenticated.
        5. Enable http basic authentication to make the configuration complete.
           You are free to use any other form of authentication.
     */

    @Override
    protected void configure(HttpSecurity http) throws Exception {
        http
                .authorizeRequests()
                    .requestMatchers(EndpointRequest.to(ShutdownEndpoint.class))
                        .hasRole("ACTUATOR_ADMIN")
                    .requestMatchers(EndpointRequest.toAnyEndpoint())
                        .permitAll()
                    .requestMatchers(PathRequest.toStaticResources().atCommonLocations())
                        .permitAll()
                    .antMatchers("/")
                        .permitAll()
                    .antMatchers("/**")
                        .authenticated()
                .and()
                .httpBasic();
    }
}
  • Thêm tham số sau vào cấu hình
# Spring Security Default user name and password
spring.security.user.name=actuator
spring.security.user.password=actuator
spring.security.user.roles=ACTUATOR_ADMIN
5. Tùy chỉnh các chỉ số metrics

II. Kết nối ứng dụng với prometheus
1. Cài đặt Prometheus

2. Cấu hình thêm ứng dụng cần monitor vào file prometheus.yml
# Here it's Prometheus itself.
scrape_configs:
  # The job name is added as a label `job=<job_name>` to any timeseries scraped from this config.
  - job_name: 'prometheus'
    # metrics_path defaults to '/metrics'
    # scheme defaults to 'http'.
    static_configs:
    - targets: ['127.0.0.1:9090']

  - job_name: 'spring-actuator'
    metrics_path: '/actuator/prometheus'
    scrape_interval: 5s
    static_configs:
    - targets: ['HOST_IP:8080']
3. View chỉ số trên Prometheus


III. Kết nối Grafana
1. Cài đặt grafana
2. Add prometheus data source trên Grafana


3. Add Dashboard trên Grafana


Thứ Bảy, 15 tháng 5, 2021

[K8s] Kubernetes Object

 I. References

1. https://kubernetes.io/docs/concepts/overview/working-with-objects/kubernetes-objects/

II. Các đối tượng của K8s (Kubernetes objects)

1. Định dạng

Sử dụng định dang Yaml 

2. K8sO lưu trữ các thông tin

- Ứng dụng container đang chạy là gì

- Tài nguyên cấp phát

- Các chính sách áp dụng cho ứng dụng: restart, update, khẳ năng chịu lỗi

K8sO có thể tạo, chỉnh sửa, xóa thông qua Kubernet API

3. Object Spec và Status (đặc tả và trạng thái object)

Hầu hết các K8sO đều gồm 2 object lồng bên trong là spec và status

- Spec: mô tả về thuộc tính object khi tạo

- Status: mô tả trạng thái hiện tại của Object

Tìm hiểu thêm về các thông tin spec, status, metadata có thể xem trong link sau K8s API Conventions

4. Mô tả một đối tượng K8sO

Thông thường khi sử dụng API để tạo Object, các thông tin được lưu dạng JSON trong request body. Khi dùng command kubectl thì các thông tin được lưu trong file .yaml , kubectl sẽ convert  thông tin sang dạng JSON khi thực hiện call API.

VD: file mẫu application/deployment.yaml

apiVersion: apps/v1

kind: Deployment

metadata:

  name: nginx-deployment

spec:

  selector:

    matchLabels:

      app: nginx

  replicas: 2 # tells deployment to run 2 pods matching the template

  template:

    metadata:

      labels:

        app: nginx

    spec:

      containers:

      - name: nginx

        image: nginx:1.14.2

        ports:

        - containerPort: 80


Khi tạo Deployment sử dụng file .yaml tạ sử dụng lệnh:


kubectl apply -f https://k8s.io/examples/application/deployment.yaml --record


Output thành công như sau, với các thành phần mô tả trong file hiển thị màu highlight tương ứng như hình dưới.

 
deployment.apps/nginx-deployment created


5. Các trường bắt buộc trong file .yaml

·         apiVersion – version của API sử dụng để tạo object

·         kind loại object muốn tạo

·         metadata – Dữ liệu giúp xác định duy nhất đối tượng, bao gồm name, String UID, namespace (tùy chọn, nếu không ghi sẽ là default)

·         Spec – mô tả các thông tin mong muốn của Object khi chạy

Spec của object khác nhau với từng loại đối tượng K8s, chứa các trường lồng nhau và đặc tả khác nhau.

Bạn có thể tìm đặc tả cho từng loại object theo link sau: Kubernetes API Reference

VD: Đặc tả cho 1 POD: https://kubernetes.io/docs/reference/generated/kubernetes-api/v1.21/#podspec-v1-core

-          Example: định dạng file yaml mẫu

-          apiVersion: v1 
o    Group : core (core thì không cần viết vào Apiversion)
o    Version: v1
-          Kind: Pod
-          Appears In:  Link liệt kê các Object chứa đặc tả này
 
Lưu ý: It is recommended that users create Pods only through a Controller, and not directly. See Controllers: DeploymentJob, or StatefulSet.


6. K8s API references gồm các thông tin:

-          Appears In: Link các object chứa Object này

-          Example: định dạng file yaml mẫu


-          Mô tả tên group, version, kind tương ứng, Group core không cần viết trong apiVersion:

-          FieldDescription: các field và description tương ứng.

Click vào các trường có link để chuyển sang mô tả tương ứng của trường đó.

VD: click và  PodSpec để biết mô tả các trường của PodSpec, các trường được đẩy lùi dòng theo cấu trúc của Yaml.


Thứ Ba, 20 tháng 4, 2021

[k8s] Kiến trúc cụm

 A. References:

  1. https://kubernetes.io/docs/concepts/architecture/
B. Kiến trúc cụm
Gồm các thành phần
  • Node
  • Control Plane Node Communication
  • Controllers
  • Cloud Controller Manager
I. Node
K8s đặt các Container để chạy Pod trên các Node.
Node gồm các thành phần  Kubelet, Container Runtime, Kube-proxy
Mỗi Node được quản lý bởi Control Plane

1. Quản lý node
a. Add node
Có 2 cách để add 1 node vào cụm (API server)
  1. Kubelet tại node tự đăng ký vào Control Plane
  2. Người dùng add Node Object    
example, if you try to create a Node from the following JSON manifest:
{
  "kind": "Node",
  "apiVersion": "v1",
  "metadata": {
    "name": "10.240.79.157",
    "labels": {
      "name": "my-first-k8s-node"
    }
  }
}

b. Tên node
2 node không cùng tên

c. Kubelet tự đăng ký node ( self registration node)
set --register-node is true
d. Người dùng add Node
Sử dụng Kubectl
set --register-node=false
Đánh dấu node unscheduler, run
kubectl cordon $NODENAME

e. Node status

A Node's status contains the following information:

Chạy lệnh sau: 
kubectl describe node <insert-node-name-here>


II. Control Plane node communication
III. Controller
IV. Cloud Controller Manager